OSGi Getting Started
By Michael N. Lipp

Bndtools
Bndtools is an Eclipse plugin that integrates the (command line) tool bnd in Eclipse and provides “continuous build” for bundles. Install it now1.
The tool bnd takes a different perspective on defining bundles. From bnd’s point of view, MANIFEST.MF is the source of information about the bundle at runtime only. While developing the bundle, you need closely related, but sometimes slightly different information and additional information. So, to bnd, MANIFEST.MF is an artifact that is generated during build time from information contained in a file called bnd.bnd. The eclipse plugin bndtools provides a GUI for editing bnd.bnd (again with the possibility to edit the source directly) and components that make the information from bnd.bnd available to Eclipse’s continuous build.
There is a tutorial for Bndtools, which I found (at the time of writing this) to be rather confusing2. It addresses developers with some OSGi experience rather than users who want to get an (Eclipse based) environment for developing their first bundle. So let’s simply once more focus on our Simple Bundle and port it to a Bndtools project.
Creating the Projects
In order to be able to work with Bndtools without problems, you need a so called configuration project (a.k.a bnd workspace). Bndtools is a great Eclipse plugin, but … during the last three years there has never been a version which was distributed with up-to-date templates for the wizard that creates the configuration project (or a bundle project). So open “Window/Preferences/Bndtools/Repositories”, “Enable templates repositories” and restart Eclipse3.
Now use the wizard to create a “Bndtools OSGi Workspace” (File/New/Other/Bndtools).
Choose the “Minimal workspace”, everything else is outdated.
You’ll see a project cnf having been created in your workspace. Ignore it for the time being. Use the wizard again and create a new “Bndtools OSGi Project”. Choose the Bndtools/Empty template and use SimpleBundle-bnd as project name. If you’re using JavaSE-9 or later, skip the creation of module-info.java and when the dialogue closes refresh the newly created project (right click on it and choose “refresh”)4.
Have a look at the generated folder in SimpleBundle-bnd. Double-click on SimpleBundle-bnd.jar (ignore the error dialog) and then—in the “Jar File Viewer” that
appears—double-click on MANIFEST.MF. Looks a bit familiar but much
more verbose than what we have written so far5:

Adding our Code
Copy our source package into the src folder of the new project. Open Activator.java and have a look at the error. Looks familiar. Regrettably, there’s no quick fix this time.
What we first have to do is to make the bundle with the OSGi Core API available (again).
In the “plain Java” project, we simply added a jar to the project. In the Eclipse PDE
project, the wizard found the bundle because “it happened to be available” in
Eclipse. Bndtools can also search for bundles, but we first
have to configure a so called “repository”, a searchable provider of bundles.
This could be done in the projects’s bnd.bnd but most likely we are
going to need the repository in several projects, so we add it in the
configuration project’s cnf/build.bnd.
We’ll have a detailed look at repositories later. For now you should simply add the following lines:
-plugin.3.OSGIGettingStarted: \
	aQute.bnd.repository.osgi.OSGiRepository;\
		name="OSGi-Getting-Started";\
		locations=https://raw.githubusercontent.com/mnlipp/osgi-getting-started/master/cnf/indexed-maven/index.xml
Switch to the Bndtools perspective and choose “Bndtools/Refresh Repositories” from the menu (or click on the refresh button at the top of the “Repositories” view).
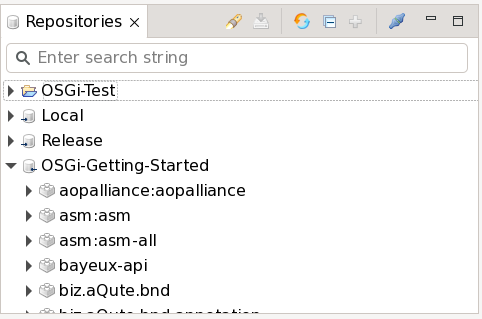
The top entry has the name of your Eclipse workspace and may vary. There must be a lot of entries in “OSGI-Getting-Started”. I found that sometimes the refresh is not sufficient and that it is necessary to restart Eclipse once more to get the full list of entries.
When you go back to Activator.java and look at the quick fix proposals for the
error at the import statement, it offers to “Add osgi.core to -buildpath
(found org.osgi.framework.BundleActivator)”. Do this. It will fix all errors.
As an alternative to using the quick fix, open bnd.bnd and
select the “Build” tab. In the “Build Path sub-window use “+” to add osgi.core
(use the search field to find the bundle in the repositories).
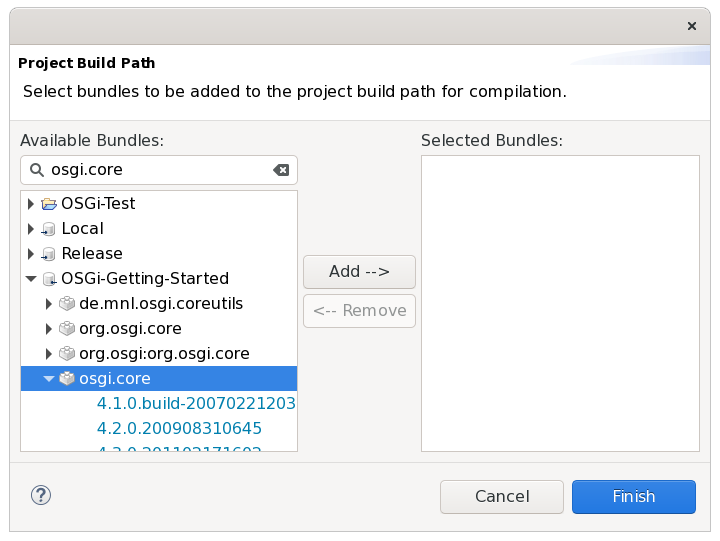
Click “Finish” and the osgi.core bundle shows up in the “Build Path”
section of bnd.bnd’s “Build Tab”.
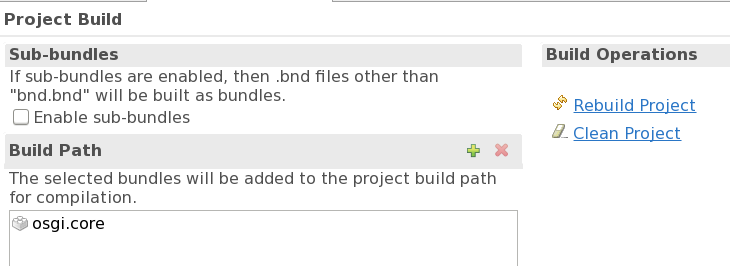
Save the file, click on “Rebuild project” (under “Build Operations”) and see the error disappear.
Completing the Bundle Configuration
No matter how you fixed the compilation problems, open bnd.bnd, go to tab “Contents”
and add the bundle’s activator. You can use content assist to enter the class name into the field (it’s the only proposal). Save again, and in the Jar file viewer, you can see the Bundle-Activator header having been added to the generated MANIFEST.MF. You can also see it on the “Source” tab of bnd.bnd, which should by now look like this:
-buildpath: osgi.core
Private-Package: io.github.mnl.osgiGettingStarted.simpleBundle
Bundle-Activator: io.github.mnl.osgiGettingStarted.simpleBundle.Activator
The basic idea about the format of bnd.bnd is that entries that are to be copied to MANIFEST.MF look just like the headers in MANIFEST.MF (well, sometimes they are processed a bit). Entries that control the behavior of the bnd tool start with a dash6.
Add version “1.0.3” in the “Content” tab of bnd.bnd. Save, and you can immediately install and start the bundle (the jar) in felix as with our previous projects. If you want to have a build time stamp as with the PDE plugin, add ${tstamp} to the version number (“1.0.3.${tstamp}”). This macro will be replaced with the build time by bnd.
More about Bnd/Bndtools
If you want to continue using Bndtools, you should have a look at the bnd documentation after reading the remaining parts of my introduction (at least up to “Cleaning up” – there are still some pieces of the puzzle missing). I recommend to start with “Introduction”, proceed with “Concepts” and read the rest as required when you encounter problems with your projects. There’s also a partially redundant (but more to the point) introduction to bnd workspaces available as part of the bndtools documentation7.
Gradle Build
Bndtools is made to cooperate with the Gradle Build Tool. Because we chose the “Minimal Workspace” when creating the “Bndtools OSGi workspace”, we didn’t get the required files for a gradle build automatically. The other templates would have generated these files. However, at the time I write this, they create files that are outdated with respect to the current version of the bnd/bndtools gradle plugin. This isn’t a big problem, because gradle support has become very easy to configure. You find all required information on the gradle plugin’s documentation page.
If you want to use the gradle build in parallel with the bndtools Eclipse plugin, you should configure a “Bnd Workspace build”8. Because an OSGi based project consists more often than not of several bundles, bundle projects are typically sub projects in a gradle project layout9. In order to support a gradle build of the projects that we have created so far, copy all gradle related files from the sample project to your project (tree) or create them yourself as explained in the bnd gradle plugin’s documentation.
When you now type “./gradlew clean build” in the root projects you see, well, nothing.
The gradle build creates the bundle at exactly the same location
(generated/SimpleBundle-bnd.jar) as the continuous build by Eclipse. So to really
verify that the gradle build works, exit Eclipse first (or uncheck “Project/Build
Automatically”).
To make absolutely sure that the dependencies between the tools are clear, let me
summarize. The Eclipse Bndtools feature provides plugins for Eclipse that support
editing of bnd.bnd files, inspection of jars, and use the information from bnd.bnd
(and cnf/build.bnd) to provide a class path container for the continuous Eclipse
build. It integrates bnd into Eclipse for the evaluation of the bnd.bnd files
and the generation of the MANIFEST.MF as part of the continuous build.
At the center of the gradle workspace build is the same bnd tool. The “gradle plugin” provides gradle task configurations (by applying the plugin) using the project specific build information from bnd.bnd (and cnf/build.bnd), thus making bnd.bnd the primary
source of information for the gradle build (as far as bundles are concerned). The results from the Eclipse build and the gradle build are exactly the same. Using Bndtools in combination with gradle therefore does not make your project depend on Eclipse.
-
This chapter was originally written in 2016 using bndtools 3.2.0. However, the current version has been updated to comply with bndtools 6.1.0 and Eclipse 2021-12. ↩
-
When I last had a look at it, it was marked as “out of date” and as to be replaced by something new. So when you read this, maybe things have changed for the better already. ↩
-
No idea why they don’t make this the default setting. ↩
-
This shouldn’t be necessary and is most likely an Eclipse bug. ↩
-
Probably this is really the simplest bundle that you can have. ↩
-
Comparing this with PDE’s approach as shown in the previous part, you could say that
bnd.bndcombines the information maintained by PDE inMANIFEST.MFandbuild.properties. ↩ -
After following the development of bnd/bndtools for more than three years by now, I find it a bit astonishing that the same people who write the precise, enterprise targeted, formal OSGi specifications make such a mess of their tooling documentation. IMHO the “Bndtools Workspace Conepts” (subtitled “Introduction to the basic bnd workspace model”) should simply be a chapter in a (cleaned up) bnd documentation, instead of an independent part of an (otherwise rather sparse) bndtools documentation that can only be fully understood when reading the bnd documentation in parallel10. ↩
-
Although it is, of course, correct that the non-workspace build does not require a
cnfdirectory, while the workspace build does, it is better to think of the non-workspace build as a “gradle first” build (i.e. configuration is mostly done inbuild.gradle), while the workspace build is a “bnd first” build (i.e. configuration is mostly done inbnd.bnd). As the Eclise Bndtools plugin focuses on managing things withbnd.bndfiles, it can be better combined with the workspace build. ↩ -
A difficulty with this project layout is that you cannot see the top level gradle project’s files in Eclipse. This can be fixed by using the nested project layout that Eclipse started to support with version 4.5 (Mars). Create a new project of type “General” named e.g. “OSGi-Tests”. Delete the projects created so far from your workspace (it should only contain “OSGi-Tests” now) and close Eclipse. Move everything in your workspace (except folders “OSGi-Test” and “.metadata”) into the folder “OSGi-Tests”. Re-open Eclipse again and re-import the projects that are now sub-projects of “OSGi-Tests”. Choose “Project Presentation: Hierarchical” in the “Project Explorer” window to see everything in Eclipse. ↩
-
Don’t get me wrong, I appreciate the work of everybody who participates in the development of bnd/bndtools and I’m very thankful that these tools exist, especially for free! ↩