OSGi Getting Started
By Michael N. Lipp

Using a Service
Now let’s really use the log service. Activate the log statement in HelloWorld and replace the System.out.println statements in Activator (comments regarding features explained already have been removed):
public class Activator implements BundleActivator {

    private ServiceTracker<LogService, LogService> logServiceTracker;
    static public LogService logService = null;
    private HelloWorld helloWorld;

    @Override
    public void start(BundleContext context) throws Exception {
        if (logServiceTracker == null) {
            logServiceTracker = new ServiceTracker<LogService, LogService>(
                    context, LogService.class, null) {
                @Override
                public LogService addingService(ServiceReference<LogService> reference) {
                    LogService result = super.addingService(reference);
                    if (isPreferred(reference)) {
                        logService = result;
                    }
                    if (helloWorld == null) {
                        logService.log(LogService.LOG_INFO, "Hello World starting.");
                        helloWorld = new HelloWorld();
                        helloWorld.start();
                        logService.log(LogService.LOG_INFO, "Hello World started.");
                    }
                    return result;
                }

                private boolean isPreferred(ServiceReference<LogService> candidate) {
                    ...
                }

                @Override
                public void removedService(ServiceReference<LogService> reference,
                                           LogService service) {
                    super.removedService(reference, service);
                    LogService nowCurrent = getService();
                    if (nowCurrent != null) {
                        logService = nowCurrent;
                        return;
                    }
                    if (helloWorld != null) {
                        logService.log(LogService.LOG_INFO, "Stopping Hello World.");
                        helloWorld.interrupt();
                        try {
                            helloWorld.join();
                        } catch (InterruptedException e) {
                        }
                        helloWorld = null;
                        logService.log(LogService.LOG_INFO, "Hello World stopped.");
                    }
                    logService = null;
                }
            };
        }
        logServiceTracker.open();
    }

    @Override
    public void stop(BundleContext context) throws Exception {
        logServiceTracker.close();
    }
}
Running this shows … nothing. Well, not really nothing, “Hello World” is printed all right. But there are no log messages. Like me, you might be tempted to start searching for a log file. Don’t, you won’t find anything.
The log service is designed a bit differently from what you expect from a logging facility. When log is called, the log service creates a LogEntry, stores it in an overwriting circular buffer with implementation-specific size and notifies any registered LogListeners. In order to see anything, we first have to install and start a bundle that provides and registers a
LogListener with the log reader service. The log listener forwards the log entries to the console, a file or whatever.
One would assume that it should be easy to find a simple OSGi bundle that implements this functionality. But, I (or the search engine) failed. Instead of spending more time on searching, I decided to provide my own simple forwarder to standard java.util.logging (JUL). Which raises the question how you can add an independently provided OSGi bundle to your project.
Focusing on the Eclipse GUI (Bndtools), an easy way is outlined in its FAQ. Looking at things a bit closer, you’ll find that the action described there modifies the cnf project that had been created when we used Bndtools for the first time. The cnf project is needed by the bnd tool that is the basis for Bndtools. The bnd tools refers to the cnf directory as its “workspace”1. Among some other purposes, cnf provides a repository for locally imported bundles (subdirectory localrepo) and the releases of the bundles under development (subdirectory release). The drag-and-drop approach described in the FAQ adds the bundle to the local repository.
Provided that the bundles that you want to add are maintained in some remote repository, a better approach is to add this (remote) repository to the list of repositories that are searched for bundles. Such a list is maintained in build.bnd (in the cnf project). When introducing the bndtools plugin for Eclipse, an initial version of build.bnd was created and you added an additional entry.
-plugin.1.Local: \
	aQute.bnd.deployer.repository.LocalIndexedRepo; \
		name=Local; \
		local=${workspace}/cnf/localrepo; \
		pretty=true

-plugin.2.Release: \
	aQute.bnd.deployer.repository.LocalIndexedRepo; \
		name=Release; \
		local=${workspace}/cnf/release; \
		pretty=true

-plugin.3.OSGIGettingStarted: \
	aQute.bnd.repository.osgi.OSGiRepository;\
		name="OSGi-Getting-Started";\
		locations=https://raw.githubusercontent.com/mnlipp/osgi-getting-started/master/cnf/indexed-maven/index.xml
There is also the repository GUI view that reflects this configuration.
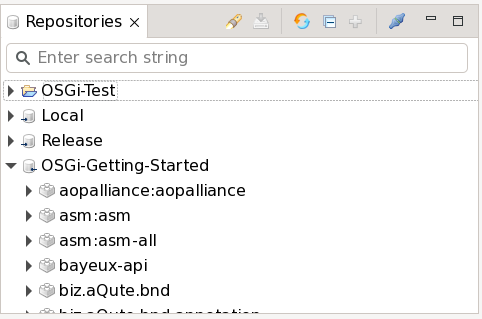
As you can see in the screenshot, the edit buttons are disabled. In previous versions of Bndtools (before 3.2.0) you could use them to add a repository. Currently, you have to edit build.bnd in the source view and add:
-plugin.4.de.mnl.osgi: \
	aQute.bnd.repository.maven.pom.provider.BndPomRepository; \
		name=de.mnl.osgi; \
		readOnly=true; \
		releaseUrls=https://repo1.maven.org/maven2; \
		query='q=g:%22de.mnl.osgi%22&rows=200'
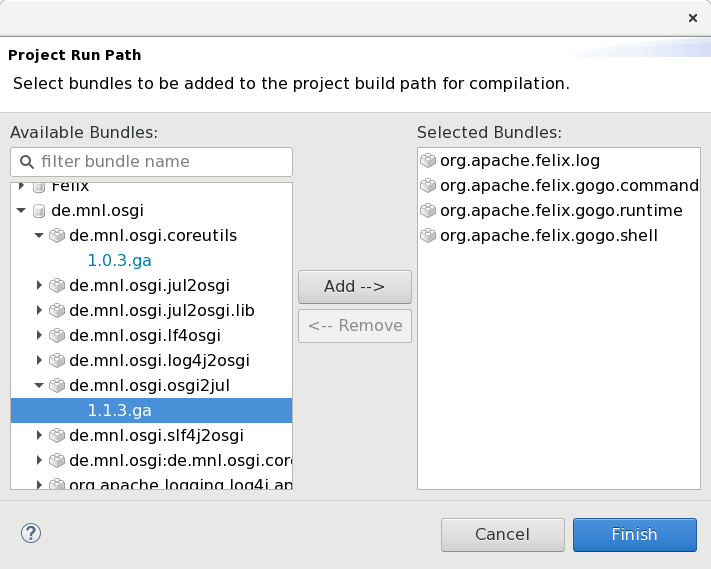
After this change2, go back to the “Run” tab of the project’s bnd.bnd editor. Use the plus icon to add the bundles de.mnl.osgi.osgi2jul and de.mnl.osgi.coreutils to the “Run bundles”.
Run the project again with the augmented set of bundles and see the log messages being printed in the JUL format. List the bundles and stop and start the simple bundle once more and observe the messages. While you’ll see a lot of messages from the framework, you’ll not (yet) see the messages from our activator and Hello World classes.
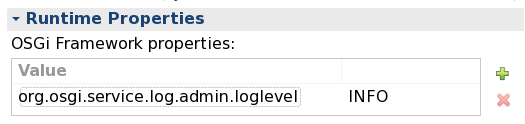
The simple reason is that the OSGi log service uses a default threshold of WARNING to filter messages being logged. We can change this by specifying a runtime property for the log service bundle. On the “Run” tab of the project’s bnd.bnd editor there is yet another field for defining such properties. Add the property org.osgi.service.log.admin.loglevel with value INFO and restart the framework3.
Finally, here they are: our log messages!
-
Not to be confused with the Eclipse workspace. The default layout puts
cnfas a top level project in your Eclipse workspace. However, the only real restriction is thatcnfmust be a sibling of the (bnd) OSGi projects under development. The layout for this introduction uses a top level (gradle nature only) project, withcnfand the sample bundle projects as children. ↩ -
To be honest, adding this repository isn’t necessary because the bundles are already also in the “OSGi-Getting-Started” repository. But this was a good opportunity to demonstrate how these things are done. ↩
-
We’ll have a look at a more sophisticated way to change the default log level later. ↩